Best Ever Chocolate Covered Strawberries Recipe – The Secrets to Success Revealed

Facebooktwitterpinterestrssinstagram
Facebooktwitterpinteresttumblrmail
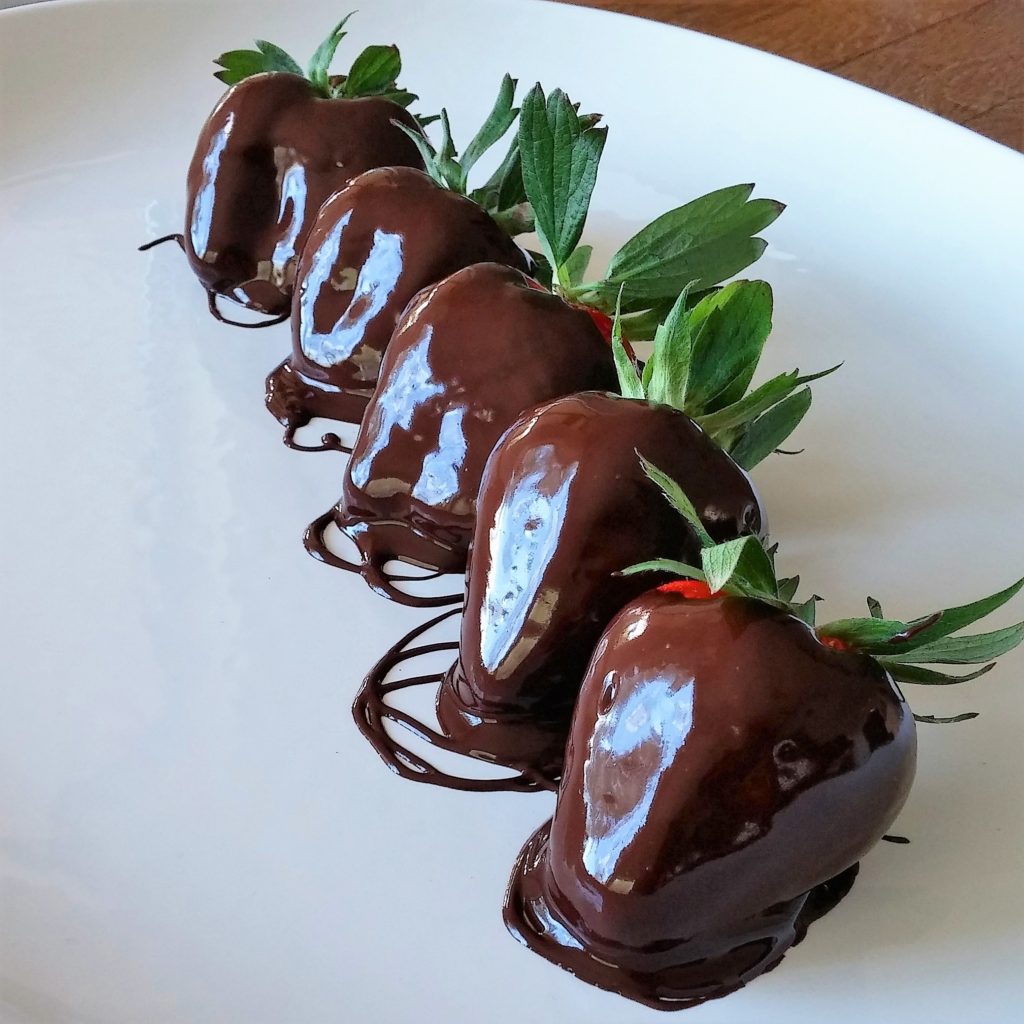
Chocolate Covered Strawberries

Chocolate Covered Strawberries

Copyright 2017 by Jacqueline Peppard, all rights reserved

Tried and failed before?

There couldn’t be an easier dessert recipe to make, but there are secrets you must know. Does your chocolate seem thick and hard to dip your strawberries in? Or your berries look like unattractive lumps of…well you know what I mean.

The Secret to Success.

The answer to success lies in the strawberry and chocolate preparation. In this recipe, I reveal the secrets, so you can make sexy rockstar chocolate covered berries!

Learn how to melt chocolate.

The most important ingredient is the chocolate. Here you will learn how to melt chocolate for perfect and beautiful results every time.

If you are a chocophile, this is basic skill is well worth mastering for drizzling over or dipping fruit and baked goods. Once you master the process, you will wonder what all the fuss is about.

The key to creating perfect dipping chocolate is to slowly heat at low temperature. This prevents drying out the chocolate by overheating, or worse yet burning, from which, there is no redemption. Microwaving is my preferred method – it is super fast and easy, but the double boiler method is also explained.

Not all chocolate is made the same.

Chocolate products vastly differ in their use of sugar, fat, emulsifying additives, and moisture content and the temperatures they are processed at. While cocoa butter naturally occurs in chocolate, some will have added cocoa butter, some use soy lecithin to emulsify, while others may have a combination of both. Some bittersweets have sugar listed as the number one ingredient when it should be second in line to the chocolate liquor (equal amounts of chocolate solids and cocoa butter). All these factors combine to make it variable in its texture and melting points and sometimes difficult to ascertain when you should stop heating it.

Some recipes call for adding a few tablespoons of oil or cream to add body. I have tried adding oil, but I see no reason or benefit in doing so. Quality chocolate has plenty of inherent fat content in the form of cocoa butter, so there is no need to add yet more.

Okay, so maybe you blew it – now what?

Some low quality chocolate chip brands never completely liquefy to the consistency necessary for dipping. If your chocolate doesn’t drizzle freely from a spoon and all chips or chunks have completely melted upon stirring, then you will need to add hot water.

You can most times save thick or overheated microwaved chocolate by whisking in hot water a teaspoon to a tablespoon at a time until the silky consistency is reclaimed.

Equipment:
Microwave proof glass bowl or stove top double-boiler
Heatproof spatula or spoon
Wax paper
Baking sheet

Ingredients:
1 pint-basket (1 pound) fresh strawberries – larger varieties better
12 ounces dark chocolate chips or chocolate bars chopped

Instructions:
Strawberries: Wash strawberries under cold water, drain, and spread out on a towel covered with paper towels. Pat moisture away with additional paper towels. Air-dry and rotate occasionally until each strawberry is completely dry (about 30 minutes). As they are drying, I gently coax the leaves up and away from strawberry. Important – Your strawberries must be perfectly dry before dipping.

Prepare Baking Sheet: Line a baking sheet with wax paper or parchment paper; set aside.

Chocolate: All equipment and strawberries should be perfectly dry to eliminate moisture drops from seizing up the chocolate.

You need a microwave proof glass bowl or a stove top double-boiler. Choose a deep glass bowl with a bottom smaller than the top and just big enough to contain the total chocolate amount needed. The point here is make dipping easy by concentrating the chocolate in a deep small area rather than having it spread out over a shallow wide bowl. If using a double-boiler, you may want to have a small bowl ready to transfer chocolate to for dipping.

To Microwave:
If using cream, warm for 15-30 seconds in the microwave; set aside.
Place chips or chocolate cut into 1/2 inch chunks, in a glass bowl. Begin by microwaving chocolate in 30-second increments. Complete first 30 seconds and stir non-melted chocolate into melted. Heat for another 30 seconds; then stir and mix chunks of non-melted chocolate into melted again.

Optional Cream: You may want to add three tablespoons of cream to every three ounces of chocolate to create a creamier, lighter, milk chocolate appearance and taste without the extra sugar milk chocolate usually contains.

Continue heating then stirring in 30-second increments and STOP when the majority of the chocolate has melted but not all. This step is where most people fail and overheating can occur. A small 12 oz package of chips seem to melt faster, and they may be done in less than one minute. Chunks will most likely need to heat 30 seconds longer than chips.

Gently stir the chocolate until it is silky, glistening, and completely melted. Chocolate should drizzle freely from the spoon. Be cautious with the last increment. Too much heat will ruin the chocolate and its velvety texture.

While all microwaves and chocolate vary in nature, you really can’t go wrong using the 30-second increment rule. When in doubt, go for less time and stir to finish the melting process. You can always heat it a bit more if needed in 10-second intervals. As an example: for 9 ounces of chocolate chunks, my microwave process usually takes three 30 second intervals for about 90 seconds total. But you may need an additional 10 -20 seconds depending on your microwave and chocolate.

Using a double-boiler:
Fill the bottom portion of the double-boiler with a couple inches of water and bring to a boil on high and then turn down to medium low heat for a gentle simmer. The water should not be at a roiling boil when placing the upper pan above it. Place upper pan containing chocolate bits (and optional cream) over the lower pan containing water. Water in below pan should be hot, and barely simmering. Stir until smooth and glossy. Again, chocolate should drizzle freely from the spoon. This will take at least 10 minutes of patient nursing.

You could also improvise with a small sauce pan filled with a couple inches of water and bring to a boil. Remove sauce pan from heat and place your chocolate filled glass bowl over it and stir until chocolate melts. Reheat water if necessary.

Dipping: Now we get to the fun part.

IMPORTANT – Berries should be room temperature before dipping.
Grasp strawberry by the top leaves and gently pull them back and away from berry until all are nestled in your fingers; lower bottom tip into the chocolate. Rotate strawberry as needed to completely coat in chocolate. Lift strawberry straight up and let excess chocolate drizzle back into bowl.

Transfer dipped strawberry to the lined baking sheet; do not disturb once you have placed the strawberry down. Repeat dipping process until all remaining strawberries are coated.

Let the strawberries rest until the chocolate coating is set. I like to refrigerate them to speed the hardening process, and it is perfectly fine to do so. However, make sure you bring them to room temperature before serving (about 30 minutes). If not eaten within the day, cover when completely cooled and refrigerate. They will keep up to a week.

Variation:
Melt 3 ounces of white chocolate while chocolate is drying on the counter (do this before refrigerating). Dip a small spoon into melted chocolate, let excess drip back into bowl and drizzle white chocolate across each strawberry.

Facebooktwitterpinterestrssinstagram
Facebooktwitterpinteresttumblrmail

How to Butterfly & Cook Chicken in 1 Hour or Less

Facebooktwitterpinterestrssinstagram
Facebooktwitterpinteresttumblrmail
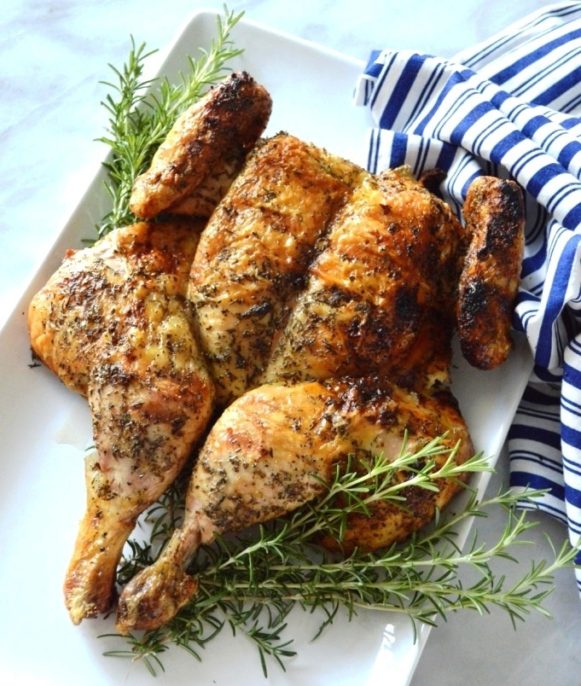
Butterflied Grilled Chicken

Butterflied Grilled Chicken

Copyright by Jacqueline Peppard, all rights reserved.

OMG!!! You can cook a butterflied chicken in the time it takes to put your groceries away?

Well, almost. Seriously though, once you master the butterfly technique, it’s effortless. Grilling or roasting a chicken this way is also known as “spatchcock” – who thought up that ridiculous word, it sounds perfectly obscene.

The meat cooks evenly and faster than other methods, and is a short cut to creating the most delicious chicken ever. The process may seem a little daunting to some (maybe your butcher will remove the spine and breastbone for you faint of heart), but honestly, it’s SO easy to do.

Learning the art of butterflied chicken is like learning a life skill, well, kind of like learning to swim. You never know when you will need it.

Family and friends will think you absolutely brilliant.

Barbecuing becomes a snap. You don’t have to mess around strategically moving each individual piece like in a chess game to ensure all is cooking perfectly. One flip of the bird and you are done – ha, take that you sad past forays into the roast chicken realms!

The end result is crispy skin, moist and juicy chicken that presents beautifully on the plate and is simply scrumptious.

Duh…you will ask yourself why you haven’t thought of this before. Throw on some veggies coated with olive oil to grill or roast along side chicken for a one pan dish.

Cheap too – Waste Not Want Not.

Purchasing a whole chicken is the most cost effective way to eat organic pasture raised meat. You will get more meals out of a whole organic chicken than a package of Tyson breasts and for less money pound per pound. A whole chicken can create at least 4 meals, if not more (think chicken enchiladas). You can freeze the backbone, breast bone, neck, gizzard and other bones for later (which will still have some meat and cartilage on them) and make nutritious chicken broth. Don’t throw away the bones as you eat the meat, but toss them in with the other parts already frozen.

Oh yeah, and with the money you save, you can buy yourself a bottle of wine – awesome!

Be Prepared – Kitchen Tools

Investing in a good pair of kitchen shears will make your life much easier and safer too, not only for this project, but for a multitude of others. If using a knife, make it a sharp (I do mean sharp) 8 inch chef knife. You will need a paring knife to release the breast bone. A large nine inch spatula is perfect for turning the butterflied chicken and fish fillets. Having the precise tools necessary for the task will keep the frustration level down and keep you happily cooking. Purchase quality, so you can keep using into perpetuity, for example, some of mine date back 40 years, yes, no kidding.

Okay, so here’s how it is done:

The recipe serves 4 but forget about leftovers. Maybe cook two, just in case you can’t stop yourself.

Ingredients:

4-5 pound chicken

Olive oil

Dried whole leaf thyme, marjoram, rosemary or sage

Garlic powder

Salt and pepper

Debone: Cutting with shears: Begin by placing chicken on its breast with backbone facing you. Start by holding tail and cut up the side of backbone (not through center but to side of backbone) working your way up to the neck. Stay as close to the backbone as you can, and exert enough pressure to cut through the rib bones. Repeat on other side and lift out backbone; open up chicken to lay flat with cavity side up.

Cutting with a knife: Begin by sitting the chicken on its butt, with backbone facing you. Starting with neck, cut down the side of the backbone and work down to tail. Stay as close to the backbone as you can, and exert enough pressure to cut through the rib bones. Repeat on other side and lift out backbone; open up chicken to lay flat with cavity side up.

To remove breast bone: Removing the breast bone will help it cook faster and more evenly. At the top of the rib cage, at bottom of where neck would attach, is a white spot composed of cartilage. With a paring knife, slice through the whitish mass down to breast bone underneath; using both hands on either side of breast bone, splay the two sides of the breast back and twist to expose the top of the breast bone. Now run your finger down the left and right sides of the breast bone to release it from flesh, and at very end of bone, use one finger to get under and pop the tip away. Breast bone should now lift out easily in a single piece.

Here is a great step by step video showing how to butterfly chicken – the best I have seen and in particular, shows you how to pop that breastbone out.

To Cook: Preheat grill to medium low (350 degrees).

Generously coat all surfaces of chicken with olive oil. Don’t get stingy here, generously rub both sides with dried thyme, marjoram, and rosemary or sage leaves (optional), garlic powder, salt, and pepper. Re-apply if necessary to thoroughly cover with herbs. Rotate legs in for a knock-kneed look. Fold chicken wing tips behind back.

Place chicken cavity or bone side down on heated grill. Close lid and cook 25 to 30 minutes (depends upon weight). Flip chicken over and cook another 25 to 30 minutes. For perfect timing, use a meat thermometer inserted into meat of thigh, but do not touch bone; cook until it registers 170 degrees.

Let rest 20 minutes before cutting. Chicken will keep cooking as it cools, and the juices will remain in the meat.

To Roast: Preheat oven to 450 degrees. Place on a broiler pan lined with aluminum foil bone side down, skin up, and cook for 15 minutes; reduce heat to 375 thereafter. Cook for 30 minutes additional time for a 4 pounder and up to an hour for a 5 pounder. Let rest 20 minutes before carving. If you have a meat thermometer, breast should register 150 degrees or leg 170 degrees before removing from oven.

Like what you see?

While this recipe is open to all, some are exclusive and available for subscribers only. Don’t miss out!  Sign up and receive monthly recipes in your email box, future exclusive recipes, private Q&A’s, giveaways, blog post notices, and more!

Facebooktwitterpinterestrssinstagram
Facebooktwitterpinteresttumblrmail

Roasted Bell Peppers – Go Ahead & Burn Them!

Facebooktwitterpinterestrssinstagram
Facebooktwitterpinteresttumblrmail
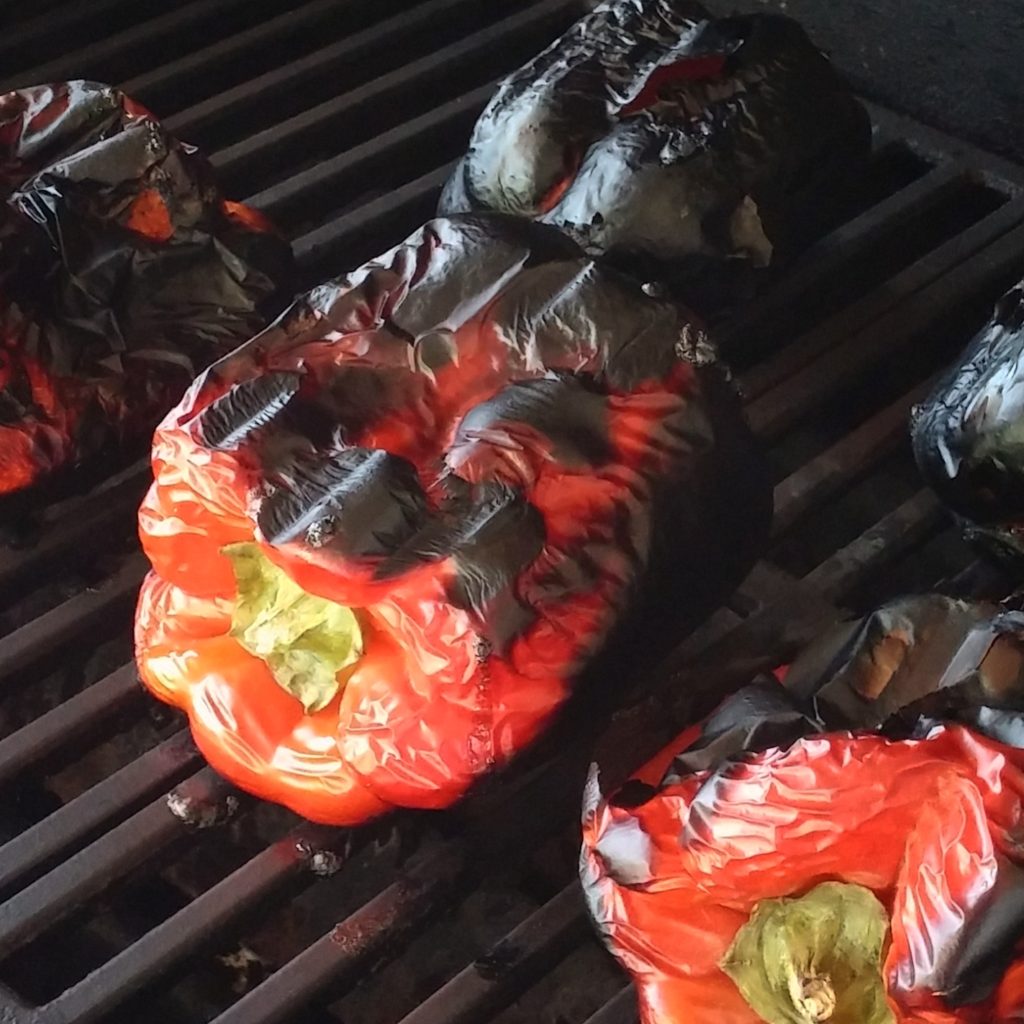
Roasted Red Bell Peppers

Roasted Red Bell Peppers

Copyright by Jacqueline Peppard, all rights reserved.

When you see deals on bell peppers or chilies, stock up and buy 12-24 of them. Roasting your own peppers is an easy, economical way to add gourmet flair to your recipes. They keep well when packed in olive oil or frozen. Great for making sauces, on cheese, sandwiches, salads, or meat.

The sauces you can make from them offer a welcomed change from the usual tomato based sauces and pair well with spiralized vegetables (perfect for zucchini) or pasta, and as a bed for or drizzled over chicken and fish.

Yes, burn them!

Here is an instance where you want to burn them, go ahead and char until mostly black or blackish brown! Unless blackened and blistered, the skin will not remove easily.

How do I do this without setting them on fire? Easy.

Broiler: Preheat broiler on high. Line pans with foil for easy clean up, and place whole bell peppers on a shallow rimmed baking or broiler pan; position under the broiler about five to six inches away from heat or in the upper third of oven. Some like to quarter, de-seed and stem before broiling, and while perhaps easier, I feel flavor is lost in the process. Cook time 20-25 minutes

Grill: The grill is my favorite way and seems to produce the best flavor. Place whole bell peppers directly on the grill top preheated to 400-425 degrees and roast with cover on or down. Check every 5 minutes and rotate. Cook time about 20-25 minutes.

Gas Stove Top: Place directly over open gas burner and turn with tongs. Should be above flame, but not in flame. This method is best used when needing one or two bell peppers and definitely not recommended when processing large quantities. Cook time about 15 minutes for each pepper.

How do I know they are done?

Check the peppers after about three to five minutes. Rotate your pepper as needed until the skin has blistered and charred black on all sides.

I know, it seems just wrong!

Yes, you must almost entirely blacken the pepper’s surface.

Can I char them too much?

Well, yes you can. Stop when the most of the pepper’s surface is blistered and charred and only bits of color are showing through. The front middle pepper in the photo is a perfect example.

When the entire pepper skin has charred on all sides, remove the pepper (or peppers) from the grill and place in a baking dish or large bowl, bottoms down.

Seal tightly with plastic wrap, a lid, or a dish to prevent moisture from escaping. Hey, a cookie sheet works fine too as a cover.

Let the roasted peppers rest covered for 15-20 minutes. This process releases the skin from the pepper meat as it cools. Don’t let them cool too long or the skins will re-attach to the flesh.

Peel the peppers; the bell pepper skin should slide off easily and don’t worry if bits of char or skin remain. Remove seeds and stems.

If not using immediately, toss and coat generously with olive oil, a tablespoon vinegar, and salt. Pack into clean small canning jars and cover with additional olive oil. These will keep up to a couple months in the refrigerator. Bring to room temperature before use.

Like what you see?

While this recipe is open to all, some are exclusive and available for subscribers only. Don’t miss out!  Sign up and receive monthly recipes in your email box, future exclusive recipes, private Q&A’s, giveaways, blog post notices, and more!

Facebooktwitterpinterestrssinstagram
Facebooktwitterpinteresttumblrmail